While chasing overheating gremlins, I discovered that a ton of leaves, little branches, and dirt had found their way into the space between the ac condenser and the radiator.
After assessing the situation and figuring out how to clean the area to the best of my ability without removing the radiator, I determined that a missing seal between the top of the radiator and the core support allowed for all this trash to end up trapped in that area.
As bad as it looked, this was not the cause for the overheating issue, but it wasn't helping either. And since I have a thing about keeping my '76 Corvette as clean as possible, I had to find a way to get all that trash out of there.
Ideally, I would have removed the radiator shroud and the radiator itself. And I tried but failed in my attempt. I think that removing the hood is necessary to get that job done, but there was no way for me to safely do so all by myself. At least not without damaging the hood, and that was not an option.
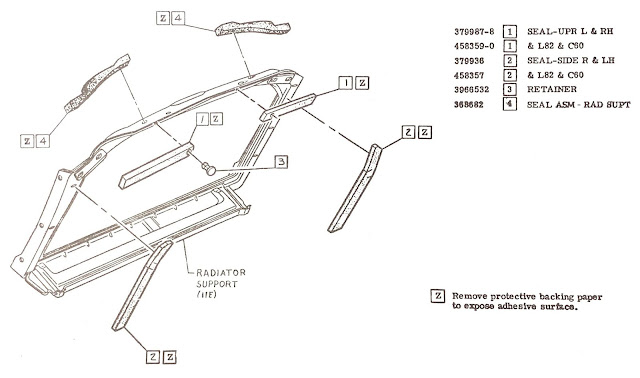
I removed a few brackets to gain better access to the area in between the radiator and condenser and also noticed that there was no seal between the top of the radiator and the core support, so I ordered a three-foot piece of 1x1" neoprene foam seal to see if I can close up that opening.
See the 1976 Corvette Assembly Manual (sponsored) images marked 1Z in the diagram below.
I also did some research online and found the Radiator Genie (sponsored), a wand kit that I think might have worked if I had a compressor or, alternatively, if I wanted to wash the radiator with water pressure. I chose not to go that route since I did not know how I would get out all those leaves trapped in there since the only exit points at the bottom of the radiator are two tiny openings for drainage purposes.
After thinking about it for a while, I thought that maybe someone had made a vacuum nozzle long enough to reach in there, and I found one.
The 24" Flexible Crevice Tool (sponsored) can be used with 1¼" vacuum hoses, but I wanted to use my shop vac for this job. However, mine has a 2¼" hose.
After a little more online sleuthing, I came up with a great solution; a 2½" to 1¼" 11-foot vac hose by Craftsman (sponsored). It fits my Ridgid shop vac perfectly.
As I waited for the crevice tool to arrive, I thought the size of some of the debris accumulated in front of the radiator would be too big for such a tool, so in the meantime, I started looking in my garage for other items I could use to vacuum the more bulky trash out of there.
I found an old half-an-inch wide by 4-foot long PVC tube that seemed it may work with a little bit of tweaking. So I cut a 45º chamfer on one end and on the other I
super glued (sponsored) a couple of strips of 1/4" neoprene. These would act as gaskets and allow me to connect the 1¼" vacuum hose to my makeshift wand.
An electrical conduit plastic pipe of the same dimensions will also work.
The photo above shows my DIY radiator cleaning vacuum wand ready for action. And the 4-foot-long PVC pipe allowed me to reach far into the radiator cavity from each end of the radiator support top openings at an angle, as shown in the picture below.
I think I spent less than ten minutes vacuuming the area which got most of the stuff out of there. On a couple of occasions, I had to remove some of the big dry leaves that would not fit into the wand, but that was easy to do.
After vacuuming out most of the dirt, dead bugs, leaves, and twigs trapped between the radiator and the ac condenser, I connected the big vacuum hose to the exhaust port and blew out as much of the smaller pieces stuck between the radiator vanes from inside the engine compartment. That loosened a lot of stuff which I also vacuumed out with my home-made wand.
When all was said and done, I ended up removing quite a bunch of stuff that was not helping the engine cooling process, and that's a good thing.
Here are a few Before and After photos that show the big difference the vacuuming made.
Again, it's not perfect. The only way to clean it one hundred percent is by removing it. But this is a huge improvement without the involved steps required to remove the radiator, so I am calling it a success!
I hope this article helps you determine if your Corvette's radiator needs a good exterior cleaning, and also how to make a simple tool for extracting dirt and bugs that don't belong in there.
Thank you for following my '76 Vette Blog!
Product Links... (#sponsored)


