A couple of months ago I posted an article about refurbishing the HVAC panel. For that project, I used a kit that included a new trim panel and control thumb-wheels.
But after posting the article I thought that some readers would enjoy learning about the possibility of actually restoring one of these panels.
At around $90 the new replacement parts are affordable. However, those ninety bucks can be used to purchase other parts. Besides, unless the HVAC control panel is completely destroyed or useless, something that would be unlikely, these units can be taken apart, cleaned, painted, lubricated, and detailed to look almost brand new again.
So I decided to dig through bins of old Corvette parts to locate the original HVAC panel and the old thumb-wheels.
They were pretty dirty and ratty looking, so it justified my decision of replacing those old components with new aftermarket replacement parts. But they also presented an interesting challenge.
Would I be able to bring these old pieces back to life?
The panel itself is a self-contained unit comprised of the trim panel, a plastic piece with flexo printing listing each function (On, Off, A/C, Heater, Vent, etc.), a backing plate, and the control unit itself which includes a sliding mechanism with indicators that point to each desired function.
These indicators are moved up or down via two thumb-wheels that are connected to the sliding mechanism and secured in place by the outer frame of the assembly.
As the photos below show, the assembly was very dirty, scratched, and faded.
Before you can start restoring the components, you have to take the unit apart, and to do this, you have to un-bend three tabs that are part of the top trim piece.
I used a small flat-head screwdriver, a pair of needle-nose pliers, and regular pliers. Once the tabs were bent back, I was able to carefully pry off the mechanism which fits under the trim pretty tightly.
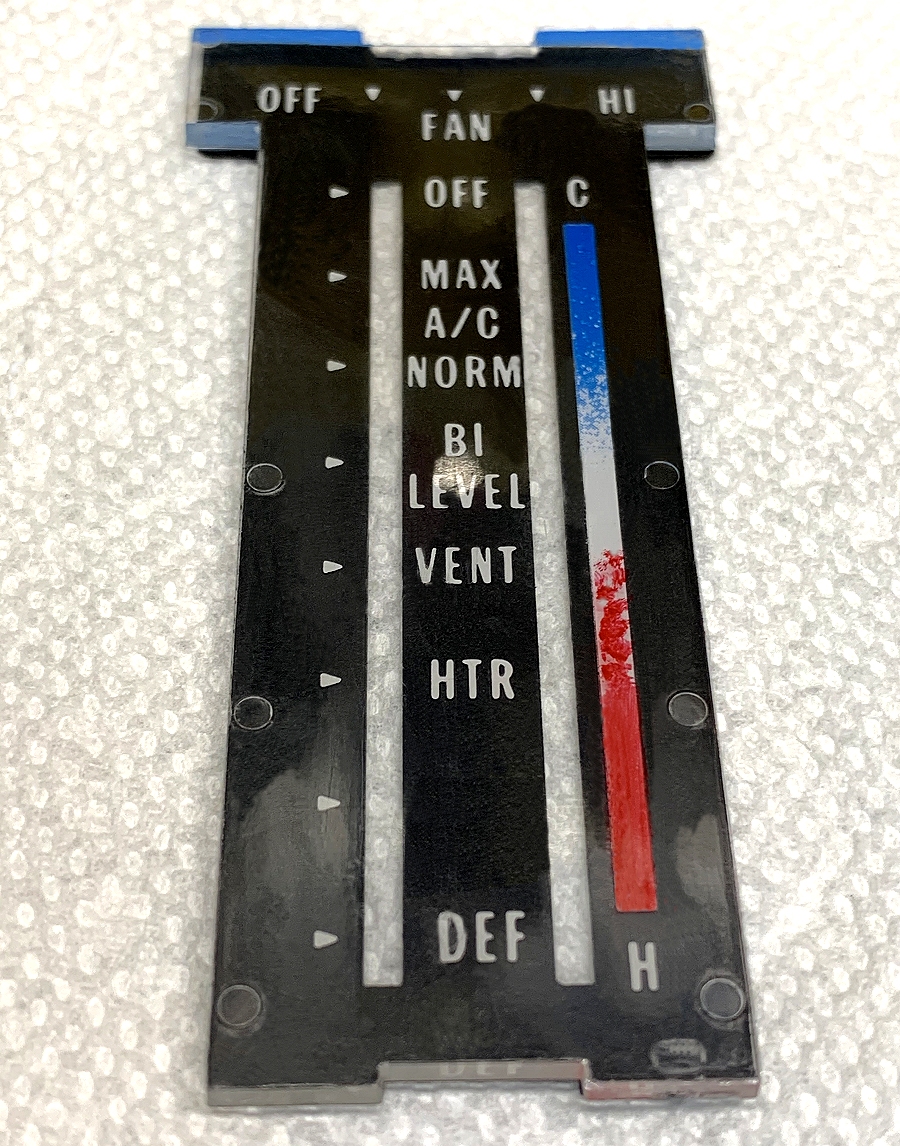
When all the parts were clean, I decided to add a touch of red to the temperature indicator. Usually, anything painted red will fade quickly when exposed to sunlight. And after forty years, the red on this clear plastic piece was completely gone.
Now, to be clear, I had no way to paint it properly since all the original panel markings were applied by flexography printing. And to be honest, I did not want to waste a lot of time restoring this particular piece.
So I defined the area that I wanted in red with masking tape, and then carefully dabbed the area with a red Sharpie to emulate the "hot" zone. As a reference, I used the "cold" setting depicted in blue as shown in the photo below.

I knew that the portion I painted red would not last since I had to paint it on the "outside" of the clear plastic, so I applied a piece of heavy-duty clear tape to protect it. I didn't think that applying a small piece of tape would look right, so I covered the whole clear panel.
I trimmed the excess with a sharp utility knife and I must say that my "repair" turned out pretty well to my surprise, although I ended up with a couple of small bubbles even though I applied the tape as carefully as possible and I also used a small squeegee to press the tape down.
In hindsight, an alternative to this approach would be to carefully remove part of the sun-bleached stripe, tape the area (on the reverse side), and dab red paint as I did with the marker, followed by a thin piece of white tape to match the original. By doing this, it would be on the same plane as the rest of the panel markings and you would not need to tape over it to keep it from rubbing off.
I know this can be an involved process, but restorations usually are.
The whole piece turned out pretty nice and I am quite proud as to how good it looks for an improvised restoration.
Is it perfect?
No. But I really doubt many people would notice the tiny imperfections
Having said that, this panel is illuminated from behind by an incandescent bulb when the headlights are on, and my red paint "repair" may not look 100% correct at night.
With this piece finished, I turned my attention to the function selector mechanism, and I cleaned the black background portion to the best of my ability.
I really thought it would be a waste of time to mask it (let alone disassemble it), to paint it black. And it was a good call since it cleaned up nicely.
I even touched up the indicators lightly with the red marker pen just for looks.
The outer trim plate was quite dirty and portions of the black paint were chipped, so this piece would need prep, primer, and black paint. As the picture below shows, this piece also has chrome edges which, fortunately, are all flat. This means that they can be cleaned after the paint has cured.
This is the trim panel after a couple of coats of filler primer.
And the trim panel after a couple of coats of
SEM Landau Black paint which has the right sheen for interior trim pieces.
The picture below shows all the restored components ready for reassembly. I also painted the backing plate to freshen it up. The backing panel sits between the clear plastic and the mechanism. They are all secured in place by the top trim plate.
The backing plate has six small "dimples," and the protrusions sit against the panel's clear plastic piece.
To reassemble it, you flip over the trim plate and install the clear plastic piece first followed by the backing plate with the protrusions against the plastic, then install the thumb-wheel mechanism and crimp the corners to secure it in place. Alternatively, you can use epoxy.
The big hole in the center (photo above), is for the bulb socket that illuminates the HVAC control panel. I recommend replacing all incandescent bulbs with LEDs.
Once the HVAC control assembly was finished, I carefully scraped the paint from the chrome edges with a sharp blade knife. This is very easy to do and adds that touch of originality to the component. Any excess paint remnants can be brushed off the edges with an artist's brush.
The thumb-wheels also received some TLC to bring them back to life, starting with a thorough cleaning to remove old grease from the gears.
You can see a bleached area on the thumb-wheels where they were exposed to sunlight for years. Both wheels were primed and painted with SEM Landau Black trim paint. However, you may want to paint yours with gloss paint versus a matte or satin finish. I did this later to ensure durability.
Before reinstalling the completed HVAC panel in the car, all that's left to do is to coat all moving parts and the wheel gears with lithium grease for a smooth and lasting operation.
With a little bit of ingenuity, patience, and a few items such as paint and tools you probably already have in your garage, you can bring new life to old components and make your C3 Corvette look great.
And even though in this case the results could be described as "Far from perfect, but perfect from afar," this HVAC control panel could be put back into service and it would most likely last for several decades. Not to mention that if you restore this component yourself, you can avoid spending around $90 for an aftermarket replacement part.
I hope you found this article helpful.
Thank you for following my '76 Vette Blog!
Product Links... (#sponsored)