
But since I don't mind a challenge when it comes to cleaning, detailing, or restoration, I kept removing parts and the end result was a sweet reward for the many hours it took me to remove years of dust and road grime.

Once the bumper cover was removed (click here for that article), I assessed what needed to be cleaned, replaced, or repaired.
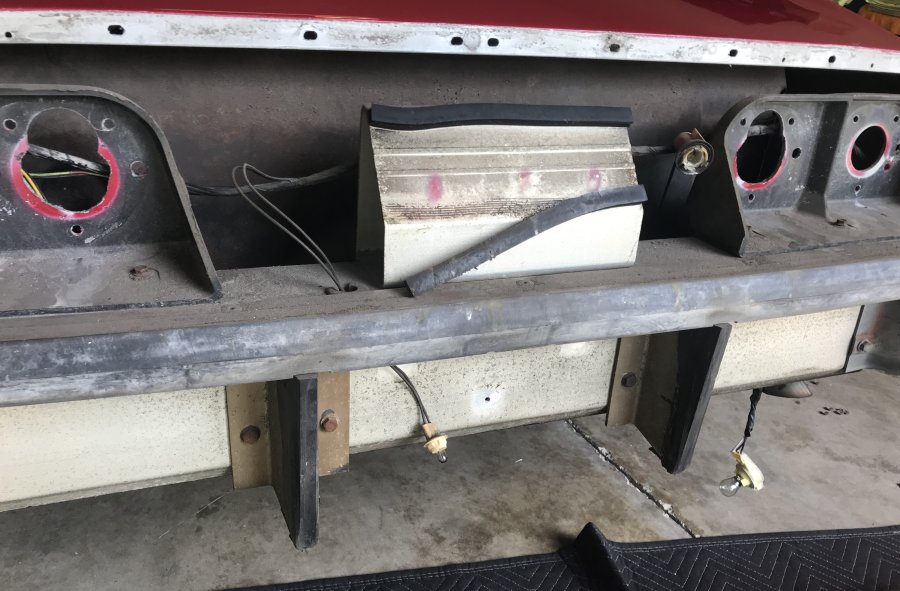
The foam pieces on the center support (above), were completely dried out and needed to be replaced. 3/4" wide by 3/8" thick self-adhesive foam seal tape took care of that.

The flange was dirty with wax and dirt buildup in addition to the factory Silver Metallic paint. The taillight support panels had overspray since the bumper cover was not removed for the body color change years ago.

With such a thick layer of dirt, I had to resort to using a wire brush as well as a putty knife to loosen the stuff. I then washed the whole area with dishwashing detergent and rinsed it with water. When the washing was done, I let it air-dry for several hours.

The picture above shows the same area after a good cleaning as well as a Rust Neutralizer treatment. I also carefully wet-sanded the flange with 320-grit sandpaper to allow for a better fit between the mating surfaces.

And, while I was there, I took the opportunity to tidy up the wiring harness and get rid of the splice connectors I had used a couple of years ago to have four brake lights instead of the original two.

I used solder heat-shrink insulated connectors instead of the splice terminals. These connectors are great and easy to install. All you need is a heat gun that allows you to solder and insulate the wires once they're connected.
If—like me—you are a do-it-yourselfer who is not that great with a soldering gun, these connectors are a must-have for the shop. They save you not only time but also lots of aggravation when compared to conventional soldering. And if you like to use shrink tubing instead of electrical tape to properly insulate wiring, these connectors do both the soldering and insulating in one step!

After the new connectors were installed, I used different sizes of flexible split-loom conduit to protect and "pretty up" the wiring harness a bit.


Not bad for a few hours of work, wouldn't you say?
But since chances of having the bumper skin off ever again are slim to none, I thought I could do better and decided to kick up my restoration efforts a notch.

So I kept on removing pieces to properly clean and/or detail them. The photo above shows one of the taillight supports. They were in okay condition but had a bit of overspray from the paint job.


Having the taillight support panels off, gave me a little bit of room to reach part of the frame rails which, as the photo above shows, were covered by a solid layer of dirt. The only way to clean them properly was to scrub them with a steel wire brush.

After wire brushing the frame portions I was able to reach, I used a spray degreaser to finish prepping the area for a rust neutralizer.

I also cleaned the inside of the quarter panels, at least as far as I was able to reach, and removed quite a bit of dirt.

Even though I had given the metal bumperettes a couple of coats of rust neutralizer, I was not happy with how they looked. I know it's foolish since you cannot see them once the cover is back on, but I guess my OCD is worse than I'm willing to admit, and off they came so I could paint them.

The inside area looked much worse with all that surface rust, so I applied a few thick coats of Loctite Rust Neutralizer to treat the metal and protect them. I also removed the rubber pieces in preparation for paint.

The center bumperettes are made out of aluminum, so I just cleaned and taped the rubber-coated sections so they could be painted. I also cleaned all the nuts and bolts with the wire brush and painted them.


The three photos above show the gas tank shield, which I had already treated with rust neutralizer, but having parts out of the way allowed me to give it another couple of coats while I applied the product to the frame rails and bumper attachment brackets.


The pics above show the bumperettes after a few coats of silver hammered-finish paint. I used whatever paint I had lying around since I just wanted to protect these pieces, but the silver hammered finish was a great choice.

The taillight support panels also received a few coats of fresh SEM Graphite paint, which again, was leftover from some other past project.

This is the nice finish you get once the rust neutralizer dries on the treated surface. Quite an improvement compared with how it looked covered with grime and dust.
I am sure you can get just as great results with POR 15. Just remember that POR stands for "Paint Over Rust" and not "Paint Over Dirt."
Surface preparation is key if you want good results.

The photo above shows the left-side bumperette reinstalled. Quite an improvement over its previous tired-looking self. Again, I know that no one will ever see these pieces once the bumper skin is back on, but I know that the whole area is clean and that's good enough for me.


I do have to admit that I feel it's a shame that all of this will be hidden soon. And I guess the only time it looked better was while my Corvette was rolling down the assembly line at the assembly plant.
Now, the reason I wanted to remove the bumper skin off of my Corvette was to have it repaired and repainted.


The rear bumper cover had, at some point, suffered a little damage, and the previous owner had attempted to perform a DIY Bondo® repair, which as the pics above show, was a FAIL!
And the "road rash" was getting worse as the area continued to crack and chip.
So I took the bumper cover to an auto body shop near Orlando.
Besides, the shop that had repainted my car from silver to its current shade of red years ago, failed to prep more than a few areas which resulted in rough surfaces painted red. You can see the results of lousy body prep in the area where the license plate sits (photo below).

Anyway, to fix the issue with the taillights, I had to fabricate a few pieces which I think will allow me to attach the taillights securely and not look like my Corvette was restored at the Home Depot.


Remember, my '76 Vette has bubble taillights which I modified a bit so they would sit a little deeper in the recesses and, therefore, not installed like the factory taillights.
Meanwhile, the rear bumper cover was being repaired and repainted, and all the rough areas were sanded so they would match the rest of the bumper.


Unfortunately, it took a couple more days than originally anticipated to get my bumper cover back since, as I was picking it up at the body shop, the darn thing bent to the point of cracking the fresh paint in two places. This was caused by the assembly retainer strip that is a two-part piece right in the area where it is the most vulnerable.
The second-from-last photo above clearly shows the weak point.
But I will save the bumper refinishing episode for another time, as it was a HUGE fail.
How big, you ask? Well... it was epic.
Thank you for following my '76 Vette Blog!

• Corvette Bubble Taillight Conversion Kit
• 1976 Corvette Service Manual
• 1976 Corvette Assembly Manual
• Loctite Extend Rust Neutralizer (8 oz.)
• POR 15 Gloss Black Paint Over Rust Paint
• Rust-Oleum Rubberized Undercoating
• Rust-Oleum Hammered-Finish Paint
• SEM Graphite Color Coat Spray Paint
• Red Auto-Mechanic Shop Towels
• 1/2" Split Wire Loom Conduit | 25 feet
• 3/8" Split Wire Loom Conduit | 25 Feet
• 1/4" Split Wire Loom Conduit | 25 Feet
• 3/4" Scotch Electrical Tape | 66 Feet
• Heavy-Duty Zip Ties: 4, 6, 8, 10 Inches | 600 pcs.
• Solder Seal Heat Shrink Insulated Butt Connectors | 50 pcs.
• 3/4" wide by 3/8" thick Self-Adhesive Foam Seal Tape